Introduction
In today’s digital landscape, effective website tracking and targeted advertising campaigns are crucial for businesses to succeed. Facebook Meta Pixel, a powerful tracking pixel, plays a key role in collecting valuable data and optimizing ad targeting strategies. This article aims to provide a step-by-step guide on how to install or set up Facebook website Pixel on your website. By understanding and implementing Meta Pixel correctly, businesses can unlock valuable insights and enhance their advertising efforts.
Understanding Meta Pixel
Facebook Meta Pixel is a tracking pixel that allows businesses to gather essential data from their website visitors. This data provides valuable insights into user behavior, preferences, and conversions, enabling businesses to optimize their marketing strategies and improve ad campaign performance. Meta Pixel works seamlessly with various advertising platforms, including Facebook Ads and Google Ads, allowing businesses to harness the full potential of their ad targeting capabilities.
Benefits of Using Facebook Meta Pixel for Website Analytics and Ad Campaigns
There are several benefits to using Facebook Meta Pixel for website analytics and ad campaigns:
- Precise Tracking: Meta Pixel allows businesses to track user interactions on their website accurately. This includes tracking page views, button clicks, form submissions, and other key events, providing detailed insights into user behavior.
- Enhanced Audience Targeting: By integrating Facebook website Pixel with advertising platforms like Facebook Ads and Google Ads, businesses can target specific audiences based on their website interactions. This enables more precise ad targeting, resulting in higher conversion rates and improved ROI.
- Remarketing Opportunities: Facebook Meta Pixel enables businesses to create remarketing campaigns, targeting users who have visited their website but haven’t converted yet. This allows for strategic ad placement and increased brand exposure, driving users back to the website and boosting conversions.
- Data-Driven Decision Making: With accurate and comprehensive data collected through Facebook website Pixel, businesses can make informed decisions regarding their marketing strategies. By analyzing user behavior and campaign performance, they can identify strengths, weaknesses, and opportunities for optimization.
Preparing for Meta Pixel Installation:
Before diving into the Facebook Meta Pixel installation process, it’s essential to prepare adequately. This involves identifying the desired platforms for ad targeting, creating accounts, and setting up relevant advertising campaigns. Gathering all necessary information and assets ensures a smooth Meta Pixel implementation.
Step-by-Step Guide to set up and install a Meta pixel:
Installing Meta Pixel requires accessing your website’s code and integrating the Facebook Meta Pixel code snippet correctly. This step-by-step guide will walk you through the installation process:
I. Setting up a Facebook Meta Pixel:-
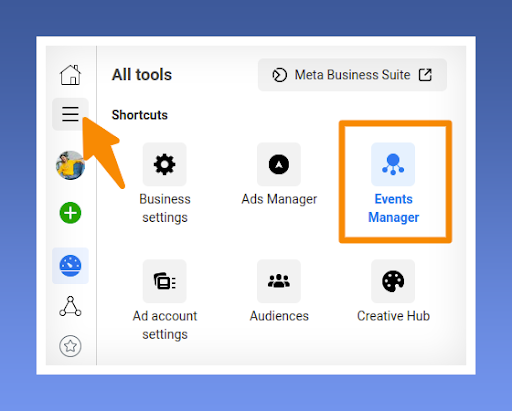
- Access Events Manager: Access the Events Manager. It allows you to set up and manage your pixels, events, and other data sources.
- Click on “+” or Add: Within the Events Manager interface, look for the option to add or create a new item. This is typically represented by a “+” symbol or an “Add” button.
- Connect data sources and choose Web, then click on Connect: Once you click on the add or create option, you will be presented with a list of available data sources. Choose the “Web” option, as you want to connect your website as the data source. Click on “Connect” to proceed.
- Create a Pixel by Providing a Pixel name: To set up Facebook meta pixel, you need to provide a name for it. This name is used for identification and organization purposes within the Events Manager. Choose a descriptive name that represents the website or project you are working on.
- Add your website: Enter the URL of your website within the designated field. This step informs the platform that you want to track events and gather data from this specific website.
- Integrate with Google Tag Manager (if applicable): If your website already has Google Tag Manager (GTM) installed, the Events Manager may recommend integrating with GTM. This allows you to manage your pixel and event configurations through GTM, offering more flexibility and control. Consider following the recommendation if it aligns with your setup.
- Continue to the next step: After providing the necessary information, click on the “Continue” or equivalent button to proceed to the next step of the setup process.
II. Installing the Meta Pixel on Your Website:-
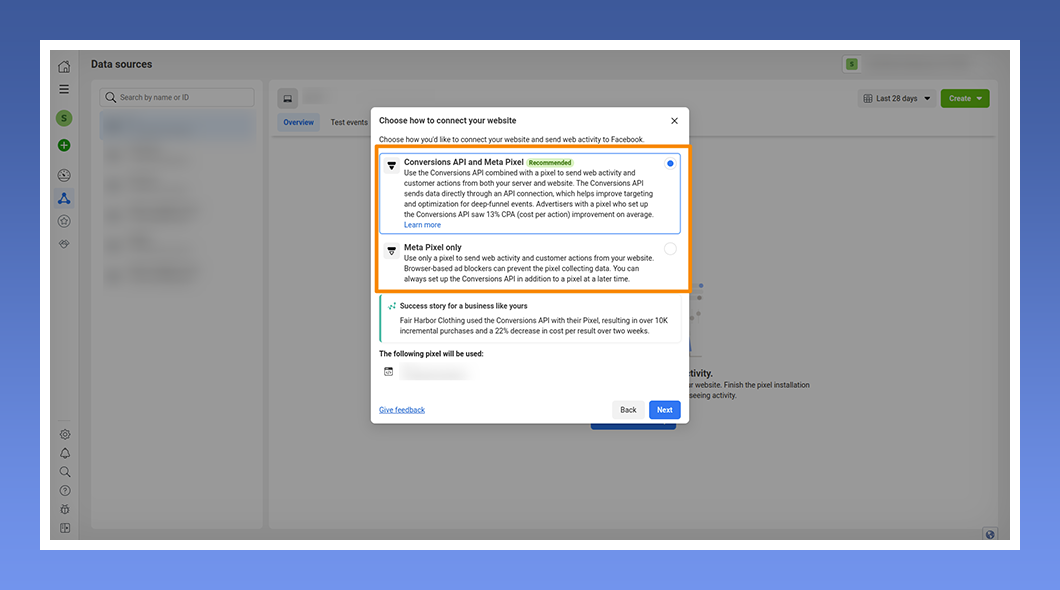
When installing the Meta Pixel on your website, you have options to choose from based on your preferences and requirements. These options include:
- Conversion API and Facebook Meta Pixel: This option allows you to connect your website using both the Conversion API and Meta Pixel. The Conversion API enables server-side tracking, providing more accurate data and ensuring that events are captured even if the pixel isn’t triggered. It offers enhanced tracking capabilities beyond what the Facebook Meta Pixel alone can achieve.
- Meta Pixel Only: If you prefer to use only the Facebook Meta Pixel for tracking and don’t require server-side tracking, you can choose the “Meta Pixel only” option. This option is suitable for standard tracking needs and provides reliable data insights for your website.
The “Meta Pixel only” option further offers two installation methods:
a) Manually add pixel code to your website:
This method involves manually inserting the pixel code into your website’s header section. By copying the pixel base code from the Events Manager, you can paste it into the appropriate location within the header section of your website. This enables the Facebook Meta Pixel to track events and gather valuable data for analysis.
b) Use Partner Integration:
Partner integrations provide a convenient way to install the Facebook Meta Pixel on your website. By selecting a partner from the available list, you can follow the on-screen instructions to set up meta pixel in the integration seamlessly. Partner integrations simplify the installation process and offer additional features and functionalities to enhance your tracking capabilities.
![]()
By carefully considering your tracking needs and preferences, you can choose the most suitable method to install the Facebook website Pixel on your website. Whether you opt for the Conversion API and Meta Pixel combination or the Meta Pixel alone, both options provide effective tracking solutions to gather essential data and measure the success of your website.
Email Instructions:
If someone else, such as a web developer or IT professional, is handling the code on your website, you can easily provide them with the necessary Facebook Meta pixel setup instructions by following these steps:
- Access Events Manager
- Click the Data sources tab on the left-hand side.
- Select the desired pixel.
- Proceed with pixel setup.
III. Setting Up Events:-
- After adding the pixel base code to your website, set up events to measure desired actions.
- Use manual installation or the Event setup tool.
- Ensure your pixel is functioning correctly.
- One pixel can be used across your entire website, including multiple pages.
Testing and Troubleshooting Meta Pixel
After installing Meta Pixel, it’s crucial to test its functionality and address any potential issues. Follow these steps to test and troubleshoot Meta Pixel:
- Testing Facebook Meta Pixel functionality:
- Perform various actions on your website to trigger events, such as page views and conversions.
- Monitor the advertising platform’s event logs or use debugging tools to verify event tracking and data collection.
- Troubleshooting common installation issues:
- PCheck for any errors in the Facebook Meta Pixel code implementation, such as missing or misplaced characters.
- Ensure that the Facebook website Pixel code is not blocked by ad blockers or affected by browser security settings.
- Refer to the documentation and support resources provided by the advertising platform for troubleshooting assistance.
Leveraging Facebook Meta Pixel Data:
Once Facebook Meta Pixel is successfully installed and functional, businesses can leverage the collected data to enhance their marketing efforts:
- Exploring insights provided by Meta Pixel data:
- Analyze user behavior patterns, such as popular pages, entry points, and exit points.
- Identify conversion funnels and optimize them for better conversion rates.
- Understand audience demographics and preferences to tailor marketing campaigns.
- Utilizing Facebook Meta Pixel data for ad targeting, remarketing, and audience segmentation:
- Create custom audiences based on specific website interactions and target them with personalized ads.
- Set up remarketing campaigns to engage users who have shown interest in your products or services.
- Segment audiences based on their behaviors and preferences for more targeted marketing strategies.
- Integrating Facebook website Pixel data with other marketing and analytics tools:
- Create custom audiences based on specific website interactions and target them with personalized ads.
- Integrate Meta Pixel data with analytics platforms to gain deeper insights into user behavior and campaign performance.
Conclusion:
Setting up Facebook Meta Pixel on your website is essential for optimizing tracking and ads targeting efforts. By following the step-by-step guide in this article, businesses can effectively implement Meta Pixel, gaining valuable insights into user behavior and enhancing ad targeting capabilities. Embrace the potential of Facebook website Pixel to unlock new opportunities for growth in the digital marketing landscape.
Additionally, The GTM Assistant app for Shopify is a tool available on the Shopify App Store. It simplifies the process of integrating MetaPixel and managing Google Tag Manager (GTM) containers for Shopify stores. With this app, you can easily install GTM, manage containers, setup GA4, Setup MetaPixel and monitor tag status. It provides a user-friendly interface, enhance tracking capabilities on your Shopify store and eliminates the need for manual coding.