1. Introduction to Google Tag Manager (GTM)
Google Tag Manager (GTM) is a free tool provided by Google that allows you to manage and deploy marketing tags (such as tracking codes, pixels, or snippets of JavaScript) on your website or mobile app without the need to modify the underlying code.
In the past, adding or changing tracking tags on your website meant diving into the code or relying heavily on developers to implement every update. With Google Tag Manager, you can skip the hassle by managing all your tags from one centralized dashboard, significantly reducing the complexity of tracking user behavior and running marketing campaigns.
GTM is especially useful for marketers, developers, and website owners who want to track the performance of their website without having to manually code every tracking script. Whether you want to track form submissions, clicks, or specific page visits, GTM gives you the flexibility to easily deploy and manage all your tags in one place.
Interested in learning more about Shopify? Let’s dive into what it is and how Shopify Plus can benefit your business!
2. How Google Tag Manager Works
At its core, Google Tag Manager simplifies the process of managing and deploying various tracking tags on your website. These tags are small pieces of code or scripts used to collect data for platforms like Google Analytics, Facebook Pixel, or Google Ads. Normally, each tag would need to be manually added to the website’s code, but GTM allows you to manage these tags all from a single dashboard. Let’s break it down:
Key Components of Google Tag Manager:
Tags: These are the snippets of code that track actions on your website, such as page views, clicks,
Triggers: Triggers tell GTM when to fire a specific tag. For example, you may want to fire a tag when someone clicks a button, submits a form, or lands on a specific page. You can set up conditions to determine when the trigger should execute.
Variables: Variables are placeholders that can hold dynamic values that change based on user interactions. For example, if you’re tracking button clicks, the button’s text might be a variable that you want to track and report in Google Analytics.
How it Works in Practice:
1. You log into your GTM dashboard, where you can add, remove, or modify tags without touching the actual website code.
2. You define triggers for when those tags should fire (e.g., when someone visits a specific page).
3. GTM then executes those tags when the specified condition is met, sending the relevant data to the desired analytics or marketing platform.
Benefits of Using GTM:
No Coding Required: Once GTM is set up on your website, you can manage all your tags without needing to access the code, making it easy to track user behavior.
Centralized Control: GTM provides a single interface to manage all your tracking tags, making updates and adjustments quick and efficient.
Built-in Templates: GTM offers pre-built templates for common tools like Google Analytics, Facebook Pixel, and Google Ads, making it easy to integrate them into your website.
3. Why Google Tag Manager is Helpful
Google Tag Manager provides several key advantages that make it an essential tool for website owners, marketers, and developers who are looking to optimize their tracking setup. Here’s why GTM is so helpful:
1. Saves Time and Reduces Reliance on Developers
Traditionally, adding or modifying tracking codes required developers to manually insert the code into the website’s backend. With GTM, marketers and non-technical users can easily add, edit, or remove tags without touching the code. This not only saves time but also reduces the need to wait for developer availability, making it faster to adapt to changing campaign requirements.
2. Centralized Tag Management
Managing tags across multiple platforms, such as Google Analytics, Facebook Ads, or Twitter Pixel, can become complicated when done manually. GTM centralizes the management of all these tags in one place. This means you can update or remove tags quickly and without the risk of accidentally breaking your site’s code.
3. Improved Website Performance
When tracking tags are manually added to the code, they can sometimes slow down your website because each tag loads independently. GTM allows you to bundle these tags into one container tag, which reduces the number of scripts that need to be loaded and can lead to faster page load times. This keeps your site running smoothly, even as you add more tags for tracking.
4. Supports a Wide Range of Third-Party Tags
GTM isn’t limited to Google products; it supports a wide range of third-party tags, such as Facebook Pixel, LinkedIn Insights, Twitter Pixel, and many more. This flexibility makes it a powerful tool for any digital marketing strategy that relies on multiple platforms for tracking and advertising.
5. Accurate and Flexible Event Tracking
With GTM, you can track a variety of user interactions, such as button clicks, form submissions, video plays, and more. By setting up triggers and variables, you can capture detailed information about user behavior on your site, which is crucial for optimizing the customer journey and conversion rates.
6. Easy to Test and Debug
GTM offers a built-in Preview Mode, which lets you test your tags before they go live. This feature ensures that your tags are firing correctly and that you’re capturing the right data. With the debugging tools, you can troubleshoot any issues in real-time, reducing the likelihood of data inaccuracies.
4. Step-by-Step Guide: How to Create a Google Tag Manager Account
Setting up a Google Tag Manager (GTM) account is a simple process that allows you to start managing your tags right away. Here’s a step-by-step guide to get you up and running:
Step 1: Visit the Google Tag Manager Website
Go to tagmanager.google.com. You’ll need a Google account to proceed, so if you don’t have one, you’ll be prompted to create it.
Step 2: Create a New Account
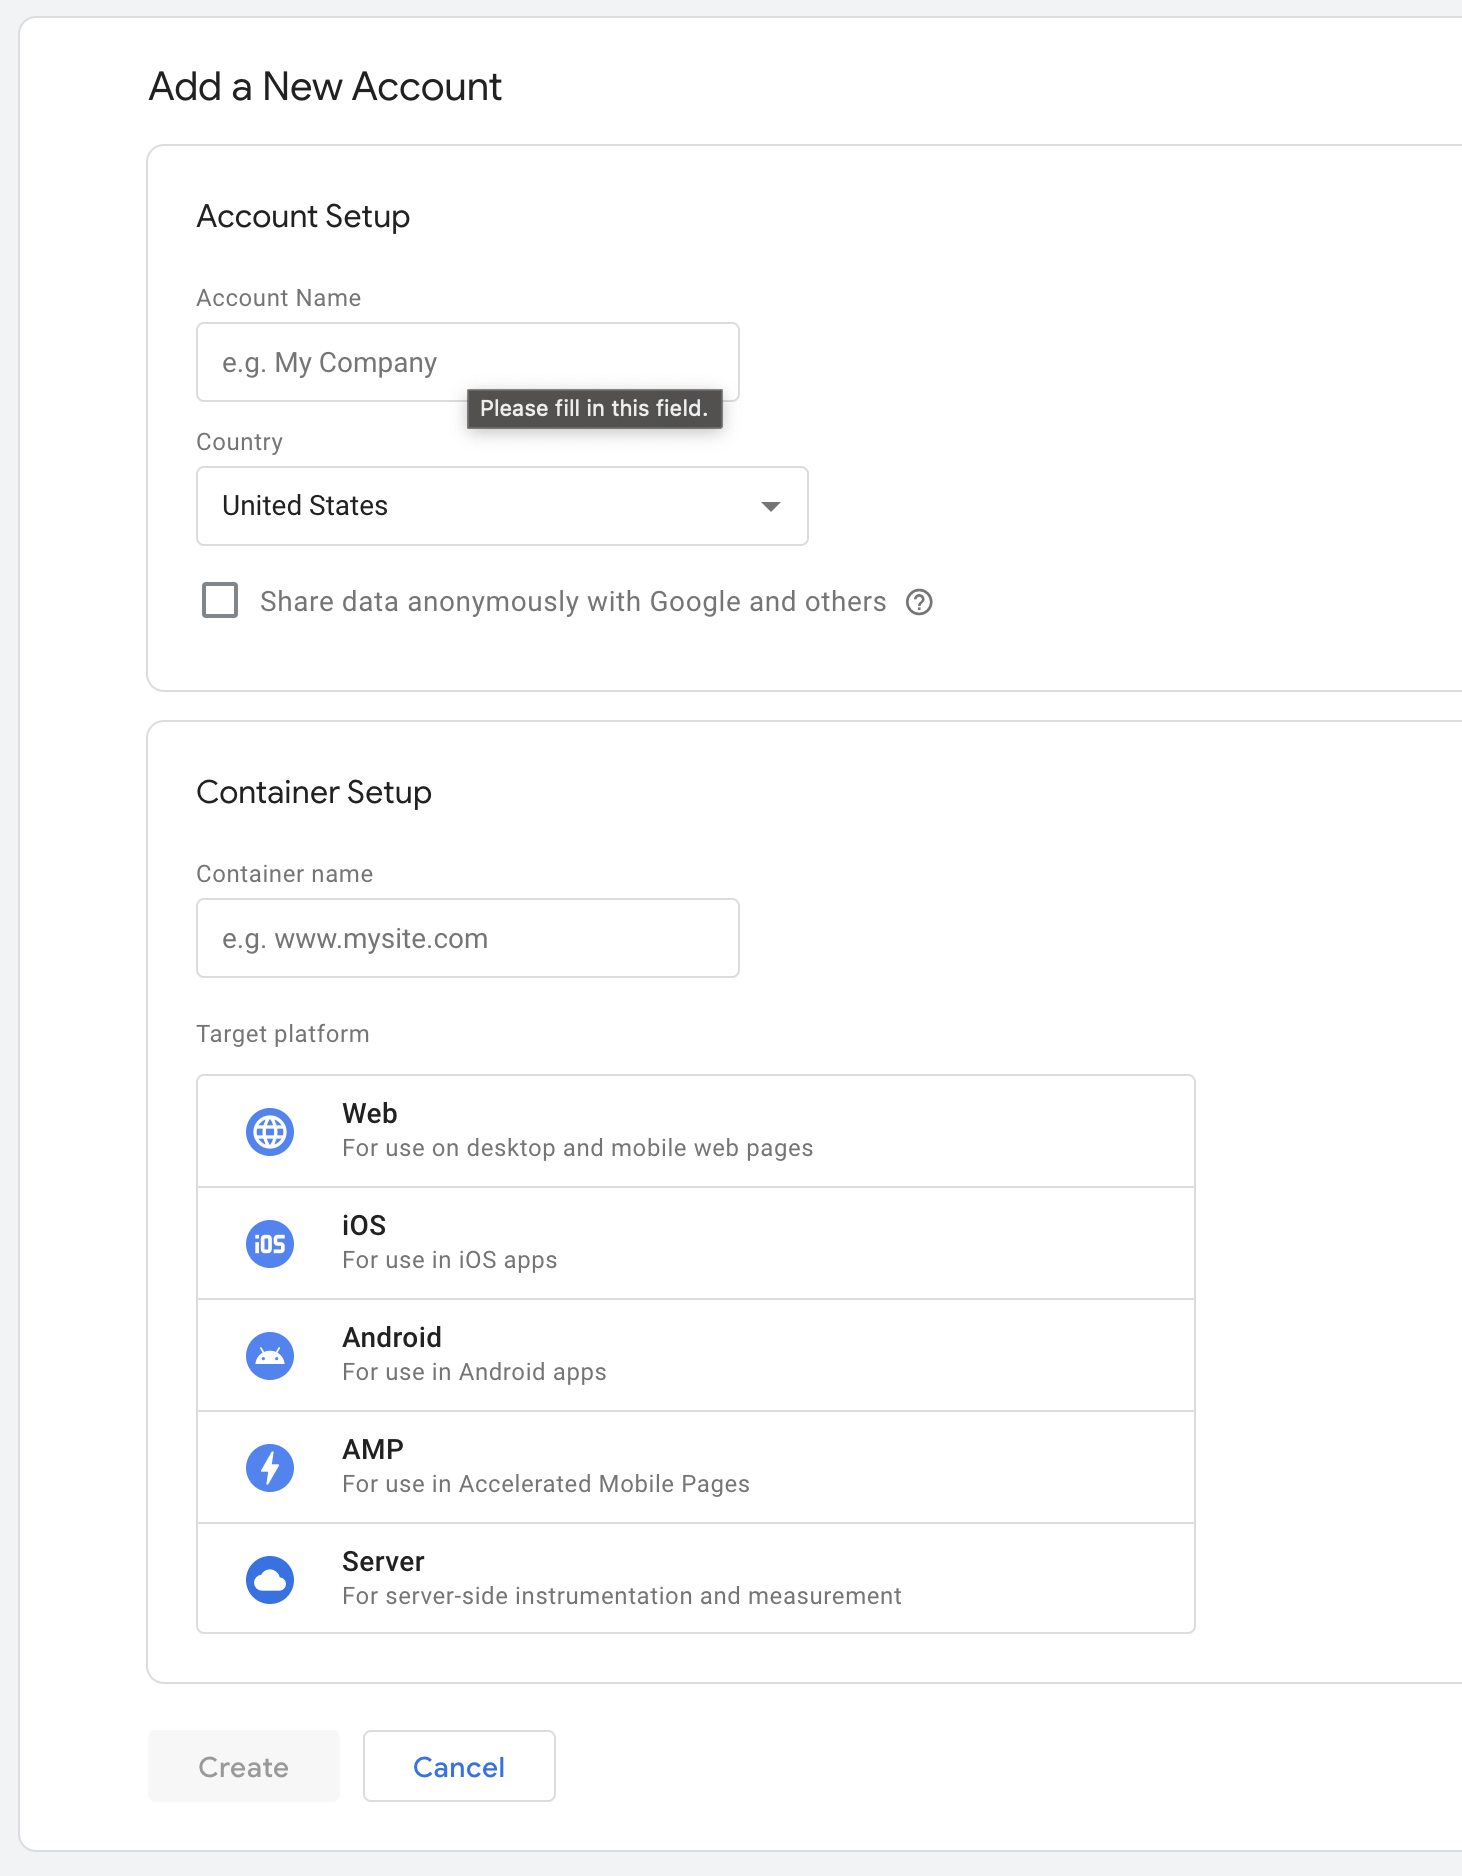
Once logged in, click on “Create Account” on the homepage. You’ll be asked to provide some basic information:

Account Name: Enter a name for your GTM account. This is typically the name of your business or organization.
Country: Select your country from the dropdown menu.
Container Setup: After naming your account, you’ll need to create a container. A container holds all your tags and configurations.
-
- Container Name: This is usually your website’s name or URL.
- Where to Use Container: Choose “Web” if you’re setting it up for a website. GTM also supports mobile apps and AMP, but for most users, “Web” is the option to select.
Step 3: Install the GTM Container Code on Your Website
After creating the account and container, GTM will provide you with two pieces of code:
- A snippet for the section of your website.
- A snippet for the section of your website.
These code snippets need to be added to your website. If you have access to your website’s HTML, place the first snippet in the section and the second snippet immediately after the opening tag. If you’re unsure how to do this, you may need assistance from a developer or use your website’s CMS (like WordPress) to add these snippets.
Step 4: Set Up Your First Tag
Now that your GTM account is created and installed on your site, you can start adding tags. Google Tag Manager provides built-in templates for commonly used tags, such as Google Analytics, Google Ads, and Facebook Pixel.
- From the GTM dashboard, click “New Tag”.
- Choose a tag type (e.g., Google Analytics).
- Configure the settings (such as the Google Analytics Tracking ID).
- Add a trigger (e.g., firing the tag on all pages).
- Save and publish the changes.
Step 5: Test Your GTM Setup
Before your tags go live, it’s always a good idea to test them. GTM has a Preview Mode that lets you verify that your tags are firing correctly without affecting real-time traffic. Click on the “Preview” button and follow the on-screen instructions to test your tags.
5. Final Thoughts
Google Tag Manager (GTM) is an essential tool for anyone looking to streamline their tag management and improve the efficiency of their website’s tracking. By centralizing all your tracking codes in one place, GTM simplifies what can often be a complicated process. Whether you’re tracking basic page views or setting up complex conversion tracking, GTM offers a flexible and powerful solution that saves both time and effort.
Not only does GTM eliminate the need for developers to manually handle each tracking tag, but it also supports a wide range of third-party tags, making it suitable for various marketing and analytics platforms. Plus, the ability to test and debug tags before deploying them ensures that your data remains accurate and reliable. Creating a Google Tag Manager account is quick and easy, and once set up, you’ll have access to a world of possibilities for tracking and optimizing your site’s performance. With just a few clicks, you can install
your first tags, track valuable user actions, and ensure that you’re getting the insights you need to grow your business.
“For Shopify store owners, the GTM Assistant app simplifies the process of installing Google Analytics and Meta Pixel via Google Tag Manager. With just a few clicks, everything is set up seamlessly. Beyond that, the app also empowers you to create custom tags and easily apply them to track clicks or views on any page element.”